Oauth2 & Silent refresh
I would like to explain step-by-step how the OAuth2 authentication mechanism and silent token refresh process are integrated.
The setup is based on OAuth 2.0, compatible with OpenID Connect, and OpenID Certified for authentication. The installation is carried out from an Angular project. The documents provided in the “Using OAuth 2.0 to Access Identity Server” section are also applicable for this service.
For easier understanding of the flow and the specific parameter definitions in the communication with Google OpenID, RFC documents, and the Identity Server, it is helpful to review the parameter explanations in the documents.
OpenID Connect | Authentication | Google for Developers
RFC 7009: OAuth 2.0 Token Revocation
RFC 7636: Proof Key for Code Exchange by OAuth Public Clients
Integrating OAuth2 Authentication Mechanism and Silent Token Refresh Process
1. Authentication Setup
OAuth2 and OpenID Connect (OIDC) are widely used protocols for secure authorization and authentication in web applications. The OAuth2 protocol enables third-party applications to access user data without exposing user credentials, while OIDC extends OAuth2 to provide user authentication in addition to authorization.
The Angular OAuth2 OIDC library simplifies the process of integrating these protocols into Angular applications. With this library, developers can quickly implement secure authentication mechanisms, including login, token handling, and silent authentication using refresh tokens. It supports multiple identity providers (e.g., Google, Microsoft, etc.), making it a flexible solution for modern web applications.
This library provides essential features such as:
• Secure token management • Automatic handling of authentication flows (authorization code flow, implicit flow) • Token renewal (silent authentication with refresh tokens) • Integration with OAuth2-compliant identity servers • Customizable login and logout flows • Support for OpenID Connect (OIDC) standards for authentication
By leveraging this library, Angular developers can integrate robust, industry-standard authentication and authorization into their applications with minimal effort.
Check out the sample-angular-oauth2-oidc-with-auth-guards repository, clone it, and try to run it. Inside the services folder, you’ll find instructions on how to access all the methods provided by the oidc-angular package.
2. Setup & Implementation
Here’s the English version of the provided document in Markdown format:
Integrating OAuth2, OpenID Connect, and Silent Refresh in an Angular Project
Step 1: OAuth2 Flow and Package Installations
OAuth2 is a standardized protocol for authorization. It replaced the original OAuth protocol in 2006. It allows users to grant access to their account or a specific portion of it without sharing their credentials. Common examples of this are logging into third-party applications or websites using accounts such as Facebook, Twitter, or Google.
For better understanding, check out the video below:
OAuth2 Simple Explanation To explore introductory videos about InterSystems technologies, visit the featured overviews page on our Learning website: Learning Website
To install the angular-auth-oidc-client package for your project, run the following command in the terminal:
npm install angular-auth-oidc-clientThis can also be added with ng add
Warning: Pay attention to version compatibility. Make sure to install the correct version of angular-auth-oidc-client for your Angular version. For example, if you are using Angular 14, ensure you install the version compatible with Angular 14+.
Step 2: Configuring Identity Server OAuth Settings
In the demo project, the OAuth 2.0 provider’s client credentials and other necessary settings are configured in src/app/core/auth-config.ts. After configuring the OAuth settings, you can begin communication with Identity Server.
The authConfig settings are similar to most OpenID-compatible auth systems such as Google, Yandex, Facebook, etc.
Warning: If you are working in a localhost environment (e.g., localhost:4200), ensure that the redirect_url is correctly added in your OAuth provider’s configuration. Other ports may cause errors.
authConfig: AuthConfig = {
    issuer: 'sso_issuer_url',
    clientId: 'client_id', // Auth Code
    responseType: 'code',
    redirectUri: 'https://localhost:3000/callback',
    silentRefreshRedirectUri: 'https://localhost:3000/silent-refresh.html',
    postLogoutRedirectUri: 'https://localhost:3000',
    scope: 'openid profile kyc',
    useSilentRefresh: true,
    silentRefreshTimeout: 5000, // Short duration for testing
    timeoutFactor: 0.25, // Short duration for testing
    sessionChecksEnabled: true,
    showDebugInformation: true,
    clearHashAfterLogin: false,
    nonceStateSeparator: 'semicolon', // Real semicolon gets mangled by Duende ID Server's URI encoding
}
Step 3: Adding the Silent Refresh Mechanism
Silent Refresh is a strategy developed to make the token renewal process more user-friendly. It allows the automatic retrieval of a new access token without the user needing to go through the login page again. This process happens silently in the background.
To enable Silent Refresh, we need to add a silent-refresh.html file. Simply copy the src/silent-refresh.html file from the demo.
Warning: After building the project, to ensure that it works in any environment (e.g., www.domain.com/silent-refresh), add the following to the angular.json file:
{
  "projects": {
    "your-project": {
      "architect": {
        "build": {
          "options": {
            "assets": [
              "src/silent-refresh.html"
            ]
          }
        }
      }
    }
  }
}
<!-- silent-refresh.html -->
<!DOCTYPE html>
<html>
<head>
<title>Silent Refresh</title>
<script>
parent.postMessage('silent-refresh', window.location.origin);
</script>
</head>
<body>
</body>
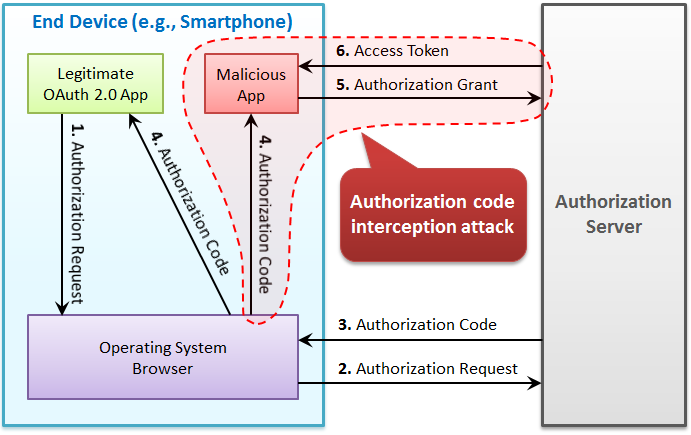
</html>Step 4: What is Proof Key for Code Exchange (PKCE)?
When using OAuth 2.0 and OpenID Connect protocols, it’s important to protect critical values such as the client_secret. This is especially important for Single Page Applications (SPA) and mobile apps, which are prone to reverse engineering.
The PKCE (Proof Key for Code Exchange) method enhances security by generating a unique code verifier and challenge pair, which are sent instead of the client_secret. This method helps secure the OAuth flow even when an attacker may have access to the authorization code.
With the pkce-challenge npm package, every code_challenge locked generates only one corresponding code_verifier key. You can use the Online PKCE Generator Tool to generate a code_challenge and code_verifier pair.
{
    "code_verifier": "u1ta-MQ0e7TcpHjgz33M2DcBnOQu~aMGxuiZt0QMD1C",
    "code_challenge": "CUZX5qE8Wvye6kS_SasIsa8MMxacJftmWdsIA_iKp3I"
}